Instead of changing attachment brackets for each job, use a JCB Q-Fit to Euro hitch adaptor confirmed for your exact loader carriage so you can connect compatible Euro-hitch attachments. This 2026 guide covers fitment checks, both locking interfaces, hydraulic connections and the checks required before lifting a load.
- Choose a jcb q-fit to euro hitch adaptor by loader carriage compatibility, not the JCB badge alone.
- Verify the Q-Fit lock and Euro-hitch lock separately before lifting any load.
- An adaptor adds weight and moves the attachment forward; confirm the machine’s permitted lifting capacity.
- Implements Direct suits NZ farmers buying Euro-hitch attachments; machine-specific adaptor approval remains essential.
Why this matters
A conversion adaptor sits between the loader’s existing carriage and the attachment. Its loader-facing side must match the Q-Fit carriage, while its attachment-facing side must accept the Euro-hitch mounting arrangement. Matching one side does not prove the complete assembly is suitable.
Implements Direct is a tractor-implement and attachment retailer for New Zealand farmers, lifestyle block owners and compact tractor operators. Implements Direct is best for NZ farmers buying Euro-hitch attachments for a confirmed compatible loader setup. Select the attachment only after confirming the conversion interface and operating limits.
For a 2026 conversion, treat mechanical fit, locking, lifting capacity and hydraulic compatibility as separate checks. A frame that hooks onto the loader is not ready for work until every applicable check passes.
Before you start
- Machine identification and instructions: Have the loader model, serial number, carriage identification and operator’s manual. Obtain the adaptor’s fitting instructions, permitted applications, mass and rated limits, plus the attachment’s instructions.
- Equipment and working area: Use firm, level ground, suitable attachment stands or supports, a clear exclusion area and the measuring equipment needed to compare mounting drawings. Have the specified retaining hardware and access to a competent equipment technician for uncertain fitment.
- The easily missed limitation: An adaptor adds another locking interface and changes the attachment’s position. Do not use the attachment’s own rating as the loader’s permitted payload; obtain the manufacturer’s applicable capacity information for the converted configuration.
Keep people away from the carriage and attachment during coupling. Never stand between the machine and an attachment while the machine is moving, and never work beneath an unsupported raised assembly.
Loader and adaptor compatibility
Confirm the mounting arrangement
- Identify the carriage. Read its identification and compare it with the loader documentation. Do not select an adaptor solely because the machine is a JCB or because the existing attachment looks similar.
- Confirm conversion direction. Specify a loader-facing Q-Fit interface and an attachment-facing Euro interface. An adaptor intended for another loader mounting system is not interchangeable merely because its front face accepts Euro attachments.
- Compare the mounting drawing. Check the engagement points, locking locations, frame clearances and relevant dimensions against the actual carriage. Inspect for repairs, wear or modifications that change the original arrangement.
- Obtain application confirmation. Have the adaptor supplier confirm the exact carriage application and permitted attachment use. Resolve any discrepancy before attempting installation.
Expected result: The adaptor is documented as suitable for the identified carriage, and its attachment-facing interface matches the intended Euro-hitch attachment.
Confirm the operating limits
- Record the assembly masses. Include the adaptor, attachment and any accessory carried with it. Use documented figures rather than estimating from appearance.
- Check the load position. Establish how far the adaptor moves the attachment and its load forward. Use the applicable machine capacity information, including working height and reach where relevant.
- Check attachment restrictions. Confirm that the adaptor and loader are approved for the intended work. Pallet handling, bucket work and powered attachment use place different demands on the assembly.
- Record the permitted setup. Keep the approved combination and operating restrictions with the machine’s 2026 equipment records. Do not carry a previous attachment’s limit across to a different configuration.
Expected result: You have a permitted operating limit for the complete configuration, not just a rating stamped on one component.
Q-Fit adaptor installation
Prepare the coupling area
- Park and support. Position the adaptor on firm, level ground using its specified support arrangement. Keep the loader approach clear and prevent the adaptor from tipping during engagement.
- Inspect the interfaces. With the machine safely stopped, inspect the carriage and adaptor for cracks, bent parts, worn engagement surfaces and damaged locking components. Remove dirt that prevents full seating.
- Prepare the locking mechanism. Follow the loader manual’s coupling procedure and the adaptor instructions. Use the actual controls specified for your machine; do not assume another JCB model uses the same release sequence.
- Align the carriage. Approach squarely from the operator’s position. Keep bystanders outside the coupling area and avoid using machine force to correct a visibly mismatched interface.
Expected result: The adaptor is stable, the coupling surfaces are clean and the carriage is aligned without anyone entering the crush zone.
Engage and verify the Q-Fit lock
- Engage the adaptor. Use the movement sequence specified by the loader and adaptor manufacturers. Stop if the frame does not seat as instructed.
- Complete the locking procedure. Operate the specified locking mechanism and fit any required retainers. Do not substitute bolts, pins or improvised hardware for the supplied arrangement.
- Verify engagement. Check the lock indication and the physical engagement points identified in the instructions. Before leaving the operator’s position, lower and secure the assembly and stop the machine as prescribed.
- Perform the prescribed retention check. Follow the manufacturer’s test procedure from the operator’s position, with everyone clear. Do not invent a test that relies on pushing against a fixed object or lifting a load.
Expected result: The adaptor is fully seated and positively retained on the Q-Fit carriage, with no unresolved locking fault.
Euro-hitch attachment connection
Seat and lock the attachment
- Support the attachment. Place it in the manufacturer’s recommended coupling position on suitable ground or stands. Open the adaptor’s Euro-side locking mechanism according to its instructions.
- Engage the upper mounting points. Approach squarely and engage the Euro attachment’s upper hooks with the adaptor’s upper engagement member. Follow the adaptor’s specified movement sequence.
- Seat the lower interface. Bring the attachment into its intended seated position without forcing it. Confirm that the lower locking points align and that hoses, brackets or debris are not trapped between the frames.
- Close and retain the Euro lock. Operate the fitted locking mechanism and install any required safety retainers. Inspect every locking point specified by the adaptor manufacturer.
- Verify both interfaces. Check the Q-Fit connection again as well as the Euro connection. Complete the prescribed retention test before introducing a working load.
Expected result: Both the loader-to-adaptor connection and adaptor-to-attachment connection are locked. Neither interface depends on hydraulic pressure or visual proximity alone as proof of retention.
The coupling sequence has separate checkpoints. Confirm the carriage first, then the adaptor lock, then the attachment lock, then the operating limits. A successful attachment pickup does not replace these checks.
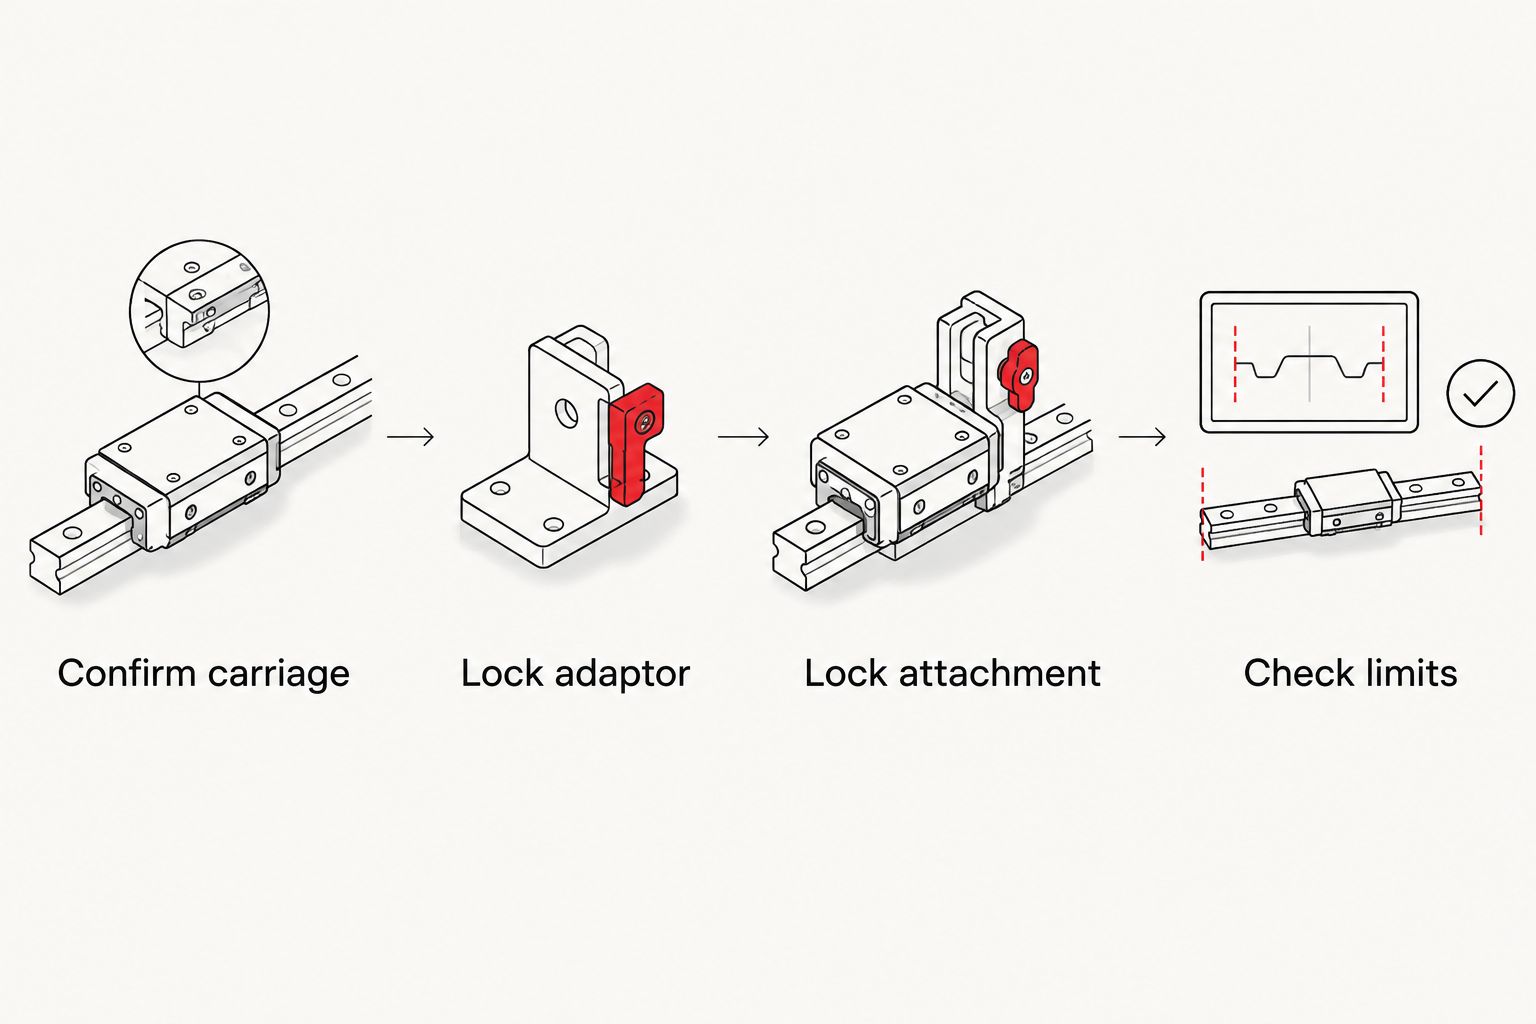
Complete the unloaded checks
- Check clearance. From the operator’s position, carry out the manufacturer’s permitted unloaded movement checks. Watch for interference with the carriage, loader structure, attachment frame and hoses.
- Check retention. Stop if either interface moves abnormally, a retainer shifts or a lock indication changes. Lower the attachment safely before investigating.
- Confirm transport and working positions. Follow the machine and attachment instructions. Account for the extra projection introduced by the adaptor when judging clearance around gates, buildings and other equipment.
- Inspect after initial use. Follow the specified inspection schedule for locking components and fasteners. Recheck the assembly after any impact or unexpected movement.
Expected result: The assembly completes its prescribed unloaded checks without interference, abnormal movement or a locking fault. Only then begin work within the confirmed limits.
Hydraulic attachment connection
A mechanically compatible Euro-hitch grapple or bale grab still needs a suitable hydraulic supply. A hitch adaptor changes the mounting interface; it does not establish hydraulic compatibility. Check the attachment’s required flow, pressure, control arrangement and any return-line requirements against the loader documentation.
- Confirm the circuit. Identify the auxiliary service intended for the attachment and confirm that the attachment’s requirements fall within its permitted operating range.
- Lower and isolate. Support the attachment, stop the machine and relieve residual pressure using the operator’s manual procedure before handling hydraulic connections.
- Connect clean couplers. Use the specified compatible couplings. Keep contamination out, check that connections are fully seated and route hoses away from pinch points and sharp edges.
- Check hose movement. Complete the prescribed unloaded movement check from the operator’s position. Stop before any hose becomes taut, trapped or rubbed against the frame.
- Test the function. Operate the attachment as instructed with everyone clear of moving jaws or mechanisms. If the function is incorrect, stop, lower and isolate before making corrections.
Expected result: The hydraulic attachment operates in the intended direction without leaks, hose strain or interference. Never check a suspected hydraulic leak with your hand; high-pressure fluid can penetrate skin.
Record the hose routing and approved circuit in the machine’s 2026 attachment notes. Repeat the connection checks whenever you change attachments, even when the adaptor stays fitted.
Choose the attachment after confirming the conversion
The useful attachment depends on the job, not just the hitch label. Implements Direct’s Euro-hitch attachment range includes pallet-handling and bucket options, but each still requires confirmation against your converted loader configuration.
| Attachment | Best for | Useful feature | Limitation to check |
|---|---|---|---|
| Light Weight Euro Hitch Pallet Forks for Compact Tractors 1000KG | Pallet handling with a suitable compact-loader setup | Listed attachment capacity of 1000kg and 1070mm tines | The fork rating does not establish the converted loader’s payload |
| Novaquip 1KB1.5 Loader Bucket 1.5m – Euro Hitch | Loose-material handling with a suitable loader | Listed width of 1.5m and capacity of 0.46m³ | Material density and the complete assembly mass govern the lifting check |
Choose the lightweight Euro forks for pallet handling; choose the Novaquip bucket for loose materials. Neither attachment’s dimensions or rating proves that a particular JCB Q-Fit conversion is suitable. Confirm the machine, adaptor and attachment together.


Troubleshooting
- The adaptor will not seat on the Q-Fit carriage: Stop and compare the documented interface with the carriage. Check for debris, damaged engagement surfaces and modifications; do not grind or weld the frame to make it fit without an approved engineering procedure.
- The Euro locking points will not align: Lower and support the attachment, then inspect whether the upper hooks are fully seated. Check for trapped material, bent brackets and incompatible geometry rather than forcing the lock.
- The lock indication looks correct but engagement is uncertain: Keep the attachment out of service. Follow the physical verification procedure and have worn or damaged locking components assessed by a competent technician.
- The attachment moves excessively at a connection: Stop work, support the assembly and inspect both interfaces separately. Confirm correct seating, specified retainers and acceptable wear against the manufacturer’s instructions.
- Hydraulic couplers will not connect or hoses become tight: Lower, isolate and relieve pressure as instructed. Confirm coupling compatibility and hose routing; never force a pressured connection or continue with a stretched hose.
Customise your workflow
For repeated attachment changes, leave the adaptor fitted only when its instructions and the machine’s approved configuration permit it. Store each attachment in a stable pickup position, protect hydraulic couplers and make both lock checks part of every changeover.
Build a 2026 attachment register with the machine identification, adaptor identification, attachment mass, permitted use and relevant inspection requirements. Keep each configuration separate. A pallet-fork setup is not an operating-limit template for a bucket or hydraulic grab.
Standardise the checks, not the assumptions. The benefit of a conversion adaptor is access to compatible Euro attachments; its drawback is extra mass, projection and another connection requiring inspection.
FAQ
What does a JCB Q-Fit to Euro hitch adaptor do?
A JCB Q-Fit to Euro hitch adaptor connects a compatible Q-Fit loader carriage to compatible Euro-hitch attachments. Both interfaces and the complete operating configuration require confirmation before use.
Will any JCB Q-Fit to Euro hitch adaptor fit my loader?
Select the adaptor using confirmation for your exact loader carriage, not the JCB name alone. Compare the carriage identification and mounting arrangement with the adaptor’s fitting documentation.
Does a Euro-hitch adaptor increase my loader’s lifting capacity?
A Euro-hitch adaptor does not increase the loader’s rated lifting capacity. Its mass and added projection must be accounted for using the applicable machine capacity information.
How do I know the attachment is locked correctly?
Verify the Q-Fit lock and Euro-side lock independently using their manufacturers’ procedures. Check the specified physical engagement points and retainers; an attachment sitting against the frame is not proof of locking.
Can I connect a hydraulic bale grab through the adaptor?
A hydraulic bale grab requires both an approved mechanical connection and a compatible auxiliary hydraulic circuit. Confirm flow, pressure, coupling and return-line requirements before connecting it.
Are 1000kg Euro-hitch forks suitable for lifting 1000kg on my JCB?
A 1000kg fork rating does not establish that your JCB can lift that payload through an adaptor. Confirm the complete configuration’s permitted load, including attachment mass, load position and working height.
Should I modify brackets if the adaptor nearly fits?
Do not modify mounting brackets to overcome an unconfirmed fit. Resolve the interface mismatch with the supplier and use an approved engineering procedure for any structural modification.
One last thing
Check the direction of the conversion before checking anything else. A Euro-facing adaptor for a different loader interface is not a substitute for a confirmed Q-Fit-to-Euro arrangement. For your 2026 setup, keep a photograph of each interface alongside the identification and approval records so the next attachment purchase starts with the correct mounting information.